In this article we will see how to style asp .net login control using custom CSS
and HTML. Some days back I have written an article about
how to style Gridview and pager with custom CSS. I receives many
requests about any article about how to style asp .net Login control with custom
CSS and HTML . So I decided to write article about styling Login control with custom
CSS and HTML.
Most of the time developers
receives website designs built by web designers or they download website designs
from internet. Some asp .net developers might find hard to integrate Login control
with the provided theme but it is very easy to integrate pre build Login control
with any HTML, HTML5 or CSS3 Theme.
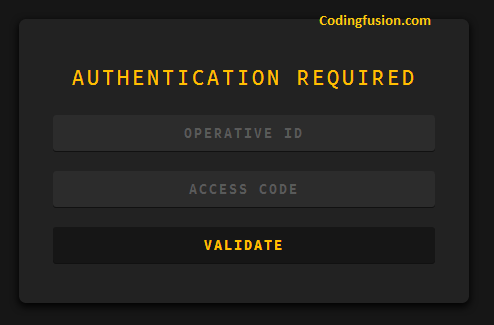
For this article I will use Login control created by Ian Quinn from CSSDeck. You can find HTML, CSS used in this
article from
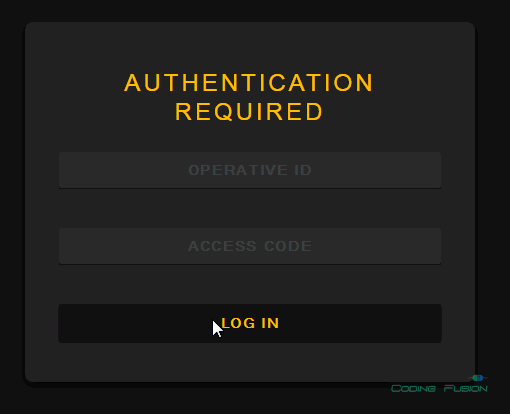
here. Our final output will be as:
Step1: Create a new asp .net website or open
existing asp .net website.
Step2: Add a new Style-sheet file. I have named
it StyleSheet.css .
Step3: Copy following CSS in your style sheet
file.
body{
  background:#161616;
  color:#888;
  font-family: 'Ubuntu Mono', sans-serif;
  text-transform:uppercase;
}

.box{
  width:90%;
  max-width:450px;
  height:auto;
  margin:0 auto;
  margin-top:100px;
  background:#222;
  border-radius:7px;
  box-shadow: 0px 3px 10px 1px rgba(0, 0, 0, 0.9);
}

.content{
  width:85%;
  height:auto;
  position:;
  margin:0 auto;
  padding:30px 0px;
  background:;
  text-align:center;
}

.content h1{
  font-size: 24px;
  font-weight:400;
  color:#FFBF00;
  letter-spacing:0.125em;
  text-align:center;
}

.field{
  width:100%;
  margin:10px auto;
  padding:10px;
  background:#2c2c2c;
  border:none;
  box-shadow: 0px 1px 0px 0px #111;
  border-radius:3px;
  outline:none;
  color:#FFBF00;
  font-weight:700;
  letter-spacing:0.125em;
  text-align:center;
  text-transform:uppercase;
}


::-webkit-input-placeholder{ /* WebKit browsers */
  color:#5A5A5A;
}
:-moz-placeholder{ /* Mozilla Firefox 4 to 18 */
  color:#5A5A5A;
}
::-moz-placeholder{ /* Mozilla Firefox 19+ */
  color:#5A5A5A;
}
:-ms-input-placeholder{ /* Internet Explorer 10+ */
  color:#5A5A5A;
}


.btn{
  width:100%;
  margin:10px auto;
  padding:10px;
  background:#161616;
  border:none;
  box-shadow: 0px 1px 0px 0px #111;
  border-radius:3px;
  outline:none;
  color:#FFBF00;
  font-weight:700;
  letter-spacing:0.125em;
  text-align:center;
  text-transform:uppercase;
}

.btn:hover{
  background:#FFBF00;
  color:#333;
}

.btn:active{
  background:#FACC2E;
  color:#333;
}
Step4: Add a new Login page in your website and insert asp .net
Login control. After inserting Login control you will see following HTML.
Step5: Go do designer and click small icon situated
at right top corner of login control and click "Convert to Template" option.
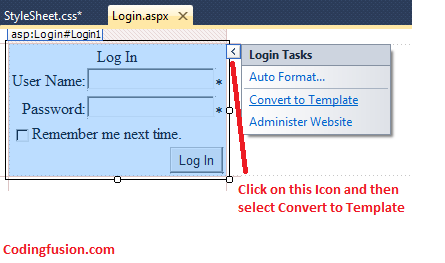
When you click this option your login control will convert into HTML and will
look like this:
|
Log In
|
|
User Name:
|
*
|
|
Password:
|
*
|
|
|
|
|
|
|
|
Step6: Remove extra HTML.
We do not need all the HTML generated by the Login control so we will remove extra
code. Remove all the HTML excepts Textboxes, Validators, Login Button and Literal
control. After removing unnecessary HTML only these control should left in your
page:
         *

         *
Step7: Copy HTML from the template and paste
in your page:
Step8: Replace textboxes and Buttons with the
input controls present in the Login template and apply CSS classes, Placeholder
tag as applied to input controls in the template. Now your HTML will look like this.
                     Authentication Required

                 *


                 *
Step9: Add reference of css file into login page.
Once again thanks to
Ian Quinn for this awesome login design.
Final Output