In this step by step asp .net tutorial we will learn how to implement dynamic Nivo image slider in asp .net. Nivo slider is Jquery based responsive image slider and it is completely free and open source to use. Some of the best features of Nivo slider are :
1. Nivo image slider is Jquery based free open source image slider. However you can also buy wordpress plugin.
2. Nivo image has beautiful and multiple transaction effects.
3. Nivo image slider has simple and flexible setup.
4. Nivo image slider is small and responsive.
5. Nivo image slider has multiple themes.
Step:1 Download Nivo slider Jquery plugin.
You can download free jquery plugin from here.Click on the Download Jquery button to start your download.

Step:2 Extract the zip package.
After downloading the file you will get a zip package. Unzip the files.

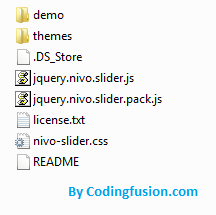
After unzip you will see following files.
Step:3 Create a new asp .net website.
Step:4 Create a new folder named "nivoResources" in your new website and paste files from extracted nivo slider folder. Create a new folder inside "nivoResources" folder named "nivoImages" to store images to be used in slider.
Your website structure will look like this:

Step:5 Create a new page in your website.
Step:6 Create a new table in your database. I have named it "NivoSlider".
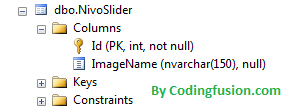
CREATE TABLE [dbo].[NivoSlider](
[Id] [int] IDENTITY(1,1) NOT NULL,
[ImageName] [nvarchar](150) NULL,
CONSTRAINT [PK_NivoSlider] PRIMARY KEY CLUSTERED
(
[Id] ASC
)WITH (PAD_INDEX = OFF, STATISTICS_NORECOMPUTE = OFF, IGNORE_DUP_KEY = OFF, ALLOW_ROW_LOCKS = ON, ALLOW_PAGE_LOCKS = ON) ON [PRIMARY]
) ON [PRIMARY]
GO
|
Step7: Create connection string in your web.config file.
<add name="myConnection" connectionstring="Data Source=YourServerName;Initial Catalog=Test;uid=sa; pwd=YourPassword; max pool size=1000; connection timeout=60; MultipleActiveResultSets=True"></add>
|
Step8: Add FileUpload control and button in your website.
<div><asp:fileupload id="myFileUpload" runat="server"></asp:fileupload> <asp:button text="Upload Image" runat="server" id="btnFileUpload" onclick="btnFileUpload_Click"></asp:button></div>
|
Note: I have here used simple upload control to upload images. However you can use multiple file upload to upload multiple files at once. you can check my detailed article here:
AjaxFileUpload example to upload multiple files in asp .net
Step9: Add following namespaces.
using System.Data.SqlClient;
using System.Configuration;
using System.Data;
|
Step10: Add following code to your button_Click method. This will upload image in your "nivoImages" folder and stores image name in database.
protected void btnFileUpload_Click(object sender, EventArgs e)
{
string fileNameWithPath = Server.MapPath("~/NivoSlider/nivoImages/") + myFileUpload.FileName.ToString();
myFileUpload.PostedFile.SaveAs(fileNameWithPath);
SqlConnection con = new SqlConnection(ConfigurationManager.ConnectionStrings["myConnection"].ConnectionString);
string cmdText = "INSERT INTO NivoSlider (ImageName) VALUES (@ImageName)";
SqlCommand cmd = new SqlCommand(cmdText, con);
cmd.Parameters.AddWithValue("@ImageName", myFileUpload.FileName);
cmd.Parameters.AddWithValue("@ImageThumbnail", myFileUpload.FileName);
if (con.State == ConnectionState.Closed)
{
con.Open();
}
cmd.ExecuteNonQuery();
con.Close();
bindNivoSlider();
}
|
Step12: Now it's time to create Nivo slider. I'll use repeater control. Put this code where you want to show nivo slider.
<div class="slider-wrapper theme-default">
<div id="slider" class="nivoSlider">
<asp:repeater id="repeaterNivoSlider" runat="server">
<itemtemplate>
<img src="<%#"NivoSlider/nivoImages/"+Eval("ImageName") %>" data-thumb="<%#" nivoslider="" nivoimages="" "+eval("imagename")="" %="">"
alt="" title="This is an example of a caption" /></a>
</itemtemplate>
</asp:repeater>
</div>
</div>
|
bindNivoSlider() Method to bind images to repeater
public void bindNivoSlider()
{
SqlConnection con = new SqlConnection(ConfigurationManager.ConnectionStrings["myConnection"].ConnectionString);
string cmdText = "SELECT * FROM NivoSlider";
SqlCommand cmd = new SqlCommand(cmdText, con);
if (con.State == ConnectionState.Closed)
{
con.Open();
}
repeaterNivoSlider.DataSource = cmd.ExecuteReader();
repeaterNivoSlider.DataBind();
}
|
Page_ Load() Method
protected void Page_Load(object sender, EventArgs e)
{
if (!Page.IsPostBack)
{
bindNivoSlider();
}
}
|
Step13: Put these JQuery refrences just above your </form> tag or </content> tag if you are using within content page.
<script type="text/javascript" src="NivoSlider/jquery.nivo.slider.js"></script>
<script type="text/javascript">
$(window).load(function () {
$('#slider').nivoSlider();
});
</script>
|
To change Nivo slider theme:
<div class="slider-wrapper theme-default">
<%--change this line to:
<div class="slider-wrapper theme-light">
<div class="slider-wrapper theme-dark">
<div class="slider-wrapper theme-bar">--%>
</div></div></div></div>
|
Final Output:

Special Thanks: I would like to thanks Nivo Slider team for such a great image slider.
Note: All image I have used are from nivo slider website for tutorial purpose only.