In this tutorial, we will walk you through the process of integrating the Tooltipster jQuery plugin into a .NET MVC application. We will create a simple view using a Modal class with fields for Name, Email, and Age, and add tooltips to display information about each field. Tooltipster is a powerful and customizable tooltip plugin that enhances user experience by providing interactive tooltips.
Step 1: Create a .NET MVC Project
If you don't have a .NET MVC project already, create a new one in Visual Studio. Name it as per your preference.
Step 2: Create a Modal Class
Let's create a Modal class to represent the data we want to collect. In your Models folder, add a new class named UserModal.cs with the following code:
public class UserModal
{
    public string Name { get; set; }
    public string Email { get; set; }
    public int Age { get; set; }
}
Step 3: Create a Controller and View
Now, let's create a controller and a view for our UserModal.
Controller: Right-click on the Controllers folder and add a new controller named UserController.cs. In this controller, create an action method to display the view:
public class UserController : Controller
{
    public ActionResult CreateUser()
    {
        return View();
    }
}
View: In the Views folder, create a folder named User and inside it, add a view named CreateUser.cshtml. This view will be responsible for rendering the form.
To integrate Tooltipster, you need to include its CSS and JavaScript files in your project. You can either download them or use a Content Delivery Network (CDN). Add the following lines to your _Layout.cshtml file within the <head> section:
<link rel="stylesheet" href="https://cdn.jsdelivr.net/npm/[email protected]/dist/css/tooltipster.bundle.min.css">
<script src="https://cdn.jsdelivr.net/npm/[email protected]/dist/js/tooltipster.bundle.min.js"></script>
In the CreateUser.cshtml view, create a form with fields for Name, Email, and Age. Add Tooltipster tooltips to display additional information for each field.
@model YourNamespace.Models.UserModal
@{
ViewBag.Title = "Create User";
}
<form>
<div class="form-group">
@Html.LabelFor(model => model.Name)
@Html.TextBoxFor(model => model.Name, new { @class = "form-control", title = "Enter your full name" })
</div>
<div class="form-group">
@Html.LabelFor(model => model.Email)
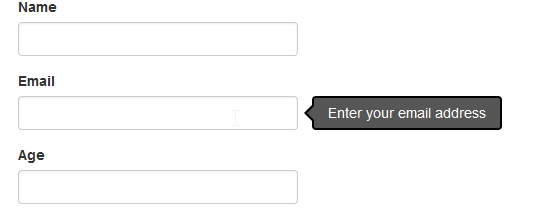
@Html.TextBoxFor(model => model.Email, new { @class = "form-control", title = "Enter your email address" })
</div>
<div class="form-group">
@Html.LabelFor(model => model.Age)
@Html.TextBoxFor(model => model.Age, new { @class = "form-control", title = "Enter your age" })
</div>
</form>
@section Scripts {
<script>
$(document).ready(function () {
$('[title]').tooltipster();
});
</script>
}
In this code, we are using title attribute for each input field to provide tooltips.
Jquery tooltipster plugin demo in asp .net MVC:
Tooltipster has lots of prebuilt options for customization. Here are some options you can try:
| animation |
fade, grow, swing, slide, fall
|
Used to control animation effect of tooltipster plugin. Default value is "fade" |
| arrow |
boolean |
Used to show hide tooltip arrow. Default is true. |
| autoClose |
boolean |
To autoclose tooltip. Default is true. |
| delay |
integer |
How long it would take tooltip to start. |
| minwidth |
integer |
Set minimum width of tooltip default is 0. |
| maxwidth |
integer |
Set maximum width of tooltip default is null. |
| position |
right, left, top, top-right, top-left, bottom, bottom-right, bottom-left |
Set the position of the tooltip. Default: 'top' |
| speed |
integer |
Set the speed of the animation. Default: 350 |
| theme |
CSS class |
Set the theme used for your tooltip. Default: 'tooltipster-default' other options are
- tooltipster-default
- tooltipster-punk
- tooltipster-noir
- tooltipster-shadow
|
Try additional options:
Let us try some additional options available. We will apply different theme, change animation and change position.
To
apply different theme to tooltipster plugin you need to refrence CSS from "CSS"=>"themes" folder.
Refrence files
Activate plugin