Validation is an integral part of building reliable and secure web applications. While ASP.NET MVC provides built-in validation attributes like Required, StringLength, and RegularExpression, there are cases where you may need to implement custom validation logic specific to your application. In this blog post, we'll explore how to implement custom validation in ASP.NET MVC models with code examples.
Creating a Custom Validation Attribute
To implement custom validation in ASP.NET MVC models, you can create a custom validation attribute by deriving from the ValidationAttribute class. Let's consider an example where we want to validate if a string starts with a specific prefix. Here's how you can create a custom validation attribute for that:
using System.ComponentModel.DataAnnotations;

public class PrefixAttribute : ValidationAttribute
{
    private readonly string _prefix;

    public PrefixAttribute(string prefix)
    {
        _prefix = prefix;
    }

    public override bool IsValid(object value)
    {
        if (value == null)
            return true;

        var str = value.ToString();
        return str.StartsWith(_prefix);
    }
}
In the above code, we define a PrefixAttribute class that inherits from ValidationAttribute. We override the IsValid method and provide our custom validation logic. In this case, we check if the value starts with the specified prefix and return true if it does, indicating a valid value.
Applying Custom Validation Attributes
Once you have created your custom validation attribute, you can apply it to the model properties that require validation. Let's consider an example where we have a Person model with a Name property that must start with the prefix "Mr." or "Ms.". Here's how you can apply the PrefixAttribute to the Name property:
using System.ComponentModel.DataAnnotations;

public class Person
{
    [Prefix("Mr.")]
    public string Name { get; set; }
}
In the above code, we apply the Prefix attribute to the Name property of the Person model. The attribute takes the prefix as a parameter, which determines the validity of the input.
Controller
public class PersonController : Controller
{
    [HttpGet]
    public ActionResult Create()
    {
        return View();
    }

    [HttpPost]
    public ActionResult Create(Person person)
    {
        if (ModelState.IsValid)
        {
            // Valid input, proceed with further actions
            // Example: personService.CreatePerson(person);
            return RedirectToAction("Index");
        }

        // Invalid input, redisplay the form with validation errors
        return View(person);
    }
}
View
@model Person

@using (Html.BeginForm("Create", "Person", FormMethod.Post))
{
    @Html.LabelFor(model => model.Name)
    @Html.TextBoxFor(model => model.Name)
    @Html.ValidationMessageFor(model => model.Name)

    <input type="submit" value="Create" />
}
Triggering Validation in Controllers
To trigger validation on the model properties in your controllers, you can utilize the ModelState.IsValid property. This property will be false if any of the validations fail. Let's take a look at an example:
[HttpPost]
public ActionResult Create(Person person)
{
    if (ModelState.IsValid)
    {
        // Model is valid, proceed with further actions
        // Example: personService.CreatePerson(person);
        return RedirectToAction("Index");
    }

    // Model is invalid, redisplay the form with validation errors
    return View(person);
}
In the above code, we check the ModelState.IsValid property to determine if the model is valid. If it is valid, we can proceed with the desired action, such as creating a person. If it is invalid, we redisplay the form, passing the invalid model back to the view for error display.
Client-Side Validation
By default, ASP.NET MVC performs server-side validation, where the validation occurs on the server after form submission. However, you can enable client-side validation to provide immediate feedback to the user without round-tripping to the server. To enable client-side validation, you need to include the necessary scripts and enable unobtrusive validation in your views:
<script src="~/Scripts/jquery.validate.min.js"></script>
<script src="~/Scripts/jquery.validate.unobtrusive.min.js"></script>

@Scripts.Render("~/bundles/jqueryval")
With client-side validation enabled, the custom validation attributes will also be applied on the client side, enhancing the user experience by catching validation errors before submitting the form.
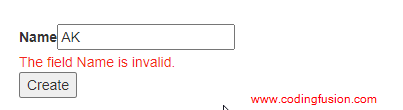
Output: